RSS Feed

Tag Archives: gardening

Recipe – Orzo Pasta with Heirloom Tomatoes, Basil and Mozzarella

It seems as though we have had another little burst of summer this week and I have found myself savouring what may be the last of the sunshine with sleeveless dresses and all the windows open.

To celebrate this, I decided to make a vibrant and summery dish using an ingredient that was new to me – orzo pasta.

orzo11

Reminiscent of risotto rice, these little pasta pieces are great as a soup base, mixed with a sauce or served as a chilled salad. I made a dish that would be great eaten warm or cold the next day and it looked and tasted amazing!

First of all, how could you not enjoy these beautiful heirloom tomatoes?

orzo10orzo13

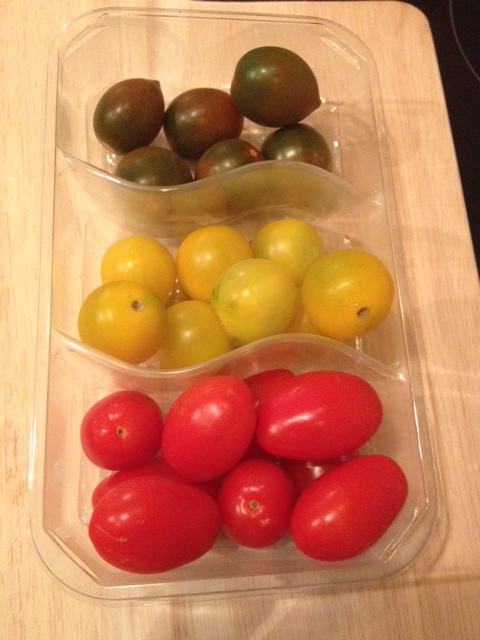
We have had a go at growing two different varieties of tomatoes this summer and are just finishing the fruits of our labour. It has made me appreciate really good quality ingredients, especially when so much of the supermarket veggies taste so bland or is that just me?!

orzo9

After looking at a few orzo recipes for inspiration, I noticed several of them recommended cooking the pasta in stock to add some additional flavour. I liked this and saved a few tablespoons of the liquid to use as a light ‘sauce’ rather than drizzle a load of oil over the pasta and it worked really well.orzo12

Ingredients

orzo6

1 chicken stock cube

150g of orzo pasta

1 punnet of heirloom tomatoes, halved (normal cherry tomatoes would also work)

A handful of fresh basil

A ball of mozzarella cheese or a tub of the mini mozzarella pearls

Salt and pepper

orzo1

How to make it

  • Bring a pan of water to the boil and crumble in your stock cube
  • Pour in the orzo pasta and cook until al dente
  • Drain the pasta leaving a bit of stock in the pan
  • Mix through the tomatoes and some basil and cook on a light heat for a few minutesorzo7
  • Add the mozzarella balls and season wellorzo8
  • Serve with a little more fresh basil and enjoy!orzo2

Recipe – Mushroom, Leek and Gruyère Quiche

Finally, the school holidays are here! It was an emotional last week of term with lots of goodbyes, a rather horrible car accident (my poor Smart car is currently off being repaired…fingers crossed it returns in one piece!) and a classroom move in this sweltering heat, but I made it and am already feeling very much in holiday mode.

quiche1 quiche2

It was strange last night not to get the usual ‘Sunday night feeling’ but I do have lots of things planned for the summer holidays so will definitely not get bored!

quiche3

So far we have had several meals outside, started work on a new area of the garden, drank Pimms from my new cocktail dispenser and I managed to burn my knees!

quiche9 quiche14 quiche16 quiche17

We also had Ian’s parents and George to stay this weekend so I tried out a new quiche recipe on them. This is the perfect time of year for quiche – it is tasty warm or chilled and throw on a bit of salad and you’ve got yourself a lovely summery lunch.

quiche4 quiche7

Ingredients

1 pack of shortcrust pastry (it was too hot to make it from scratch!)

A good glug of olive oil

3 leeks, sliced

1 tray of chestnut mushroom, sliced

Salt and pepper

A pinch of dried thyme

2 eggs

284ml of double cream

200g of Gruyère cheese, grated

How to make it

  • Begin by rolling out your pastry on a floured surface so that it fits your quiche dishDSCN0164
  • Using your rolling pin, lay the pastry over the dish (I usually grease mine first too) and use some leftover pastry scraps to gently push it into the edges of the dishDSCN0165
  • Chill the pastry case in the fridge for about half an hour and meanwhile preheat your oven to 200°C, Gas Mark 5
  • While the pastry is chilling, fry your leeks in oil for about 10 minutes then add the mushrooms and sauté for another 5 minutes
  • Season with salt and pepper and add a pinch of thymeDSCN0169
  • Once the leeks and mushrooms have softened, set the pan aside and allow to cool
  • Get your pastry case and lightly prick the base with a forkDSCN0166
  • Line with greaseproof paper then fill with baking beansDSCN0167
  • Blind bake your pastry for 20 minutes before removing the paper and beans
  • Cook for another 5-10 minutes or until the pastry is golden brown
  • In a separate jug, beat together the eggs and cream
  • Pour this mixture over the leeks and mushrooms and mix wellDSCN0170
  • Add half the Gruyère cheese and tip this filling into the pastry caseDSCN0173
  • Top with the remaining cheeseDSCN0174
  • Bake for 25 minutes until the quiche has set and is golden brownDSCN0175
  • I usually trim off the excess pastry tooquiche8

o   Enjoy warm or chilled!DSCN0181

A Little Catch Up

It felt like I didn’t have a spare second to blog last week so I thought I would start this week with a little catch up…

We have enjoyed glorious weather for the past week and I have spent most of my free time either in the garden or watching the World Cup…but the less said about England the better!

I have become slightly obsessed with my roses, which I still believe are the some of the most beautiful I have ever seen – I am even logging on to gardening websites for hints and tips! Unfortunately they don’t last very long when I have cut them and brought them inside in vases but the smell is so intoxicating I don’t really mind.

cu1 cu7 cu8 cu11 cu12 cu13 cu14

Not wanting to turn this into a gardening post but as well as my roses, I am also doing daily checks on my tomato plants and raspberries. We are growing two different varieties of tomatoes indoors in pots in the conservatory and now have about 12 baby ones coming through.

cu18 cu19

Whilst clearing away a huge bramble bush in the back garden at the weekend, I also uncovered five or six healthy-looking raspberry plants which have a nice little harvest ready to pick.

cu2

After moaning about my recent ceiling-painting, Ian and I decided to treat ourselves to a professional decorator for our hallway. It’s a big job and I don’t trust myself balancing precariously on stepladders to access those hard to reach places, so I think it is worth it. I spent a long time in B&Q finding the perfect shade of grey I wanted and the entrance hall, stairs and landing are already looking much better than they did before.

cu3

I went to a really interesting talk on chocolate moulding at our village hall with the local WI. I’m not a member but couldn’t resist the invitation from a friend to join them for an evening of tasting and making. Unfortunately I didn’t get any photographs but I will definitely put my new skills to good use soon.

I held a little pizza party for the England match with friends. It was a really fun evening and I will be sharing my foodie tips on it later this week.

cu4

Finally, my highlight of the week, well actually my highlight of 2014 so far, was seeing the legend that is Dolly Parton at Birmingham NEC last night.  Ian and I drove up with my parents and it was the most amazing concert…I’m not sure if I enjoyed the songs or all her funny stories in between them more! Having grown up listening to her, it was great to sing along to all the classics and her voice was just stunning. The tickets were pricy but I don’t know how many more UK tours she will do so it was a case of ‘now or never’ when I saw them advertised! I can’t wait to watch her again on TV at Glastonbury this weekend.

cu5

Phew…no wonder I didn’t have time to blog this week! x

Recipe – Ham, Leek, Asparagus and Mushroom Pie

Yesterday was glorious! I was in the garden after work last night (helping my neighbour try and catch his rabbit, Reggie, who keeps making a run for it!) and noted how beautiful my rose bushes are looking. They were all here when we moved in but I have made an effort to keep them pruned and well-watered and my efforts are paying off…

pie19 pie20 pie21 pie22 pie23

They also have the most gorgeous scent which fills the room when I pick them.

pie25

When Ian got home from work, we walked up to the pub for a few beers in our favourite spot, overlooking the cows and calves, before heading back home for chicken and tzatziki pittas and the news series of Orange is the New Black – a pretty perfect evening for me!

pie26 pie27 pie29

Today however looks to be wet, grey and miserable! I was saving this recipe up for such an occasion as who doesn’t love pie when the weather outside is rubbish?!

pie17

This recipe came about after we had lots of leftover ham following a roast dinner joint – the below should make enough for four hungry diners. I separated the filling in to two dishes and made two smaller pies

Ingredients

pie1

A glug of olive oil

2 leeks, sliced

A small tray of button mushrooms, halved and quartered

One small bunch of asparagus, quartered

About 3 thick slices of ham, chopped into bite-size pieces

A good pinch of dried thyme (1-2 teaspoons)

A large tub of crème fraîche

3 teaspoons of wholegrain mustard

A sheet of puff pastry (I always buy the ready-made stuff!)

How to make it

o  Begin by preheating your oven to 180°C, Gas Mark 4

o   In a large pan, heat the oil on a medium heat

o   Add the leeks and sauté for 5 minutes or sopie2

o   Then add the mushrooms and asparagus for another few minutespie3

o   Add the ham, season well and sprinkle over the thyme

o   Sauté for another 5 minutes or sopie5

o   Add the mustard and pour in enough crème fraîche so that the contents of the pan are generously coatedpie6

o   Spoon your filling into your pie dish or dishespie7

o   Cover with your puff pastry and score some little holes to release the steam whilst cookingpie10

o   I usually do a little wash with some milk over the pastry using a pastry brush to give it a golden finish

o   Pop your pie(s) into the oven and bake for around 30 minutes until well-risenpie14

I enjoyed mine with some garlic roast potatoes on the side but it is pretty substantial just as it is too! x

pie16

A Herby Update

I spent last night with a group of my favourite people. My girlfriends threw me a mini Vegas-themed hen night and I had so much fun! I didn’t want a proper hen weekend and instead have seen groups of friends separately for various things which meant I have had several mini hen nights without having to dress up as something ridiculous or see a single inflatable penis!

I have to give my party planners 10 out of 10 for decoration. I’m not sure why I have never thought of playing card bunting but it worked perfectly with the whole Vegas thing and I will definitely be copying the idea in the future!

herb11 herb12 herb13

We had a lovely BBQ sat al fresco, played several highly hilarious games, drank champagne and had a good giggle! Thank you ladies for being so thoughtful and so much damn fun!

herb19 herb20

Anyway, onto today’s post which has is about both food and gardening.

At the beginning of June, I wrote a post about some herbs I planted and the mini flags I made out of washi tape to label them with. I tried to grow basil, mint, thyme and coriander and have had a mixture of success and failure!

First up, the failures…the mint and thyme sprouted some green shoots and then not much else happened. My auntie who is somewhat of a gardening guru told me the thyme should have been outside and she was right! I was surprised at the lack of growth from the mint as I always thought this was quite a tough and hardy plant but maybe I should have started the seedlings off indoors and then moved it outside? Answers on a postcard please!

Luckily I have another mint plant growing in the front garden so my mojitos haven’t been completely mint-less!

Now, onto my successes…

herb1 herb2

The coriander and basil grown on my kitchen windowsill have done really well and I have been using them nightly in my meals. As I said before, fresh herbs make such a difference to your cooking and I have enjoyed my fresh coriander in my guacamole and my basil in several pasta dishes.

The coriander in particular has loved this hot weather and I found this week that it had grown so much it was struggling to stay upright and was also starting to sprout flowers.

herb3 herb6

A quick Google and check in my gardening books advised a trim so I sat tonight and spruced up my coriander plants (not a euphemism!) which will hopefully result in bushier and healthier plants…watch this space!

herb5 herb8

Recipe – Coconut and Lime Chicken

I realised that I haven’t posted a new recipe in a while. My Dad stocked our freezer with a variety of delicious homemade ready-meals last time he was up so I have been quite lazy in the kitchen, opting to pop one of these in the oven rather than cooking from scratch!

Last night, after a full day in the garden, I decided to try out a new recipe on Ian and these coconut chicken bites were born. I actually fancied fried chicken but felt I needed to try and make it a bit healthier!

Desiccated coconut provides the crunch and a slight sweetness in this recipe as it coats the chicken and goes golden brown and toasty in the oven. A squeeze of lime really brings the dish alive and they are great cold in a chicken salad the next day too!

I made enough for two (greedy!) people with enough left over for a light lunch the next day – you can adjust the amount accordingly

Ingredients

3 chicken breasts, chopped into goujons/ nuggets

A small bowl of plain flour

A small bowl of milk

 A small bowl of desiccated coconut

1 lime

Salt and pepper

Smoked paprika

How to make it

  • Preheat your oven to 180°C/ Gas Mark 4
  • Begin by getting your three dipping bowls set up in a sort of mini-production line of seasoned flour, milk, and finally the coconut with a teaspoon of paprika mixed incoco1
  • Take each piece of chicken and dip it in the flour, milk and coconut (in that order!) then lay the pieces on an oven traycoco2
  • Bake for 10 minutes then turn each piece of chicken over and bake for another 5-10 minutes until golden browncoco4
  • Squeeze over the limecoco7
  • I served mine with my sweet potato chips and a roasted beetroot and goats cheese salad…gin and tonic optional!coco5
  • These chicken bites go really well with a serving of sweet chili sauce or if you like things spicy then Ian drizzled hot sauce over his toococo6

How To…Make Mini Washi Tape Flags

I spent all of yesterday afternoon outside indulging in a spot of gardening. I had collected quite a few packets of herb seeds so decided to get them in some soil ready for salads and cocktails in the summer.

herb6

Whilst I do use dried herbs in my cooking, there is no substitute for fresh herbs and rather than continue to buy the fresh pots at the supermarket which last about a week, I decided to create my own little collection. I already have two healthy parsley plants on the go and yesterday I planted thyme, basil, mint and coriander seeds in various planters.

First up was a lovely wooden herb planter I picked up last week that contained everything you need to grow basil and thyme. I also got one of these for my friend Hannah’s birthday a few weeks ago. I have to admit that I have a really bad habit when buying presents for people where I also pick up one for myself too! I think this shows that I have good taste in presents and I buy my friends something that I would use too but it can get expensive!

herb28

This planter set was really simple to use and I think these ready-to-go sets are great for those who don’t have a lot of room at home to garden or the less confident gardener.

herb30

Armed with my trusty Cath Kidston gardening gloves and a cup of tea, I planted these seeds, watered them and then set them up on my kitchen windowsill in the sunlight. (Excuse the hideous windowsill picture…we are mid-tiling!)

herb27 herb5

Next up was mint. As this is a very invasive plant, I wanted to keep this in a planter on its own so it wouldn’t be able to spread or take over any other nearby plants. I popped the mint seeds into some freshly packed compost and placed it in a shady spot in the garden.

herb7 herb20

Then I planted up my coriander seeds (which smelt lovely and lemony)…

herb23

…and some more basil as we can get through lots of this in salads.

herb16

So that was all the hard work completed and I will do a post in a few weeks to see how these seeds have got on and some recipes that I use these different herbs in…maybe I’ll have a ‘Herb Week’ on the blog – wait and see!

herb18

I was left with several pots but no labels to tell which was which. I know it is fairly obvious to see once the herbs start growing but I decided to attempt a little DIY craft session to make my own planter flags.

herb12

These are so easy to make and could also be used in cocktails or as cake/ cupcake toppers too.

If you haven’t come across washi tape before, it is Japanese fabric tape which can be used for almost anything. Just Google it or have a look on Pinterest and you will see lots of cool ways to use it (my favourite is the Washi Tape Bicycle!) but it is also great for present wrapping with plain brown parcel paper.

herb19

I got these from ebay for about £1 each and I had to be very restrained only buying three rolls as the patterns are all so pretty!

To make these flags, you will need:

herb1

  • Washi tape
  • Scissors
  • Cocktails sticks
  • A pen

Cut the washi tape to size and peel off the backing paper (excuse my grubby fingers and the soil still under my nails!)

herb2

Place a cocktails stick in the middle of the tape

herb3

Fold it across as evenly as you can

herb4

Write on your message/ herb and then cut a small triangle out of one end to make them look super cute!

herb13

And here they are in action…no herbal confusion in this house now…I just need to keep my fingers crossed that these all start growing!herb14 herb15 herb8 herb9 herb11

These are also on my kitchen windowsill now and loved the sunshine we had today!

herb29

Recipe – Cheesecake Stuffed Strawberries

Like almost every British blogger will do today, I am going to start my post by mentioning the glorious weather we have enjoyed! The words ‘Bank Holiday’ and ‘sunshine’ don’t seem to go together very often so when we do get a sunny weekend, we definitely make the most of it!

strawb1

Ian and I decided to spend as much time as possible outside in the garden, giving it some much needed TLC so he mowed the grass whilst I removed as many weeds as possible…teamwork!

strawb3

I love drying our washing outside on the line

strawb17

The whitest legs in the South West

strawb16

As you probably know, I like to eat outside as often as possible and today we had our lunch on the picnic bench at the bottom of the garden, listening to the horses in the field behind us.

strawb6

We had fresh melon and Parma ham

strawb9

Freshly-cut French baguette and butter

strawb8

The ubiquitous savoury eggs (!)

strawb7

Fresh anchovies in a lovely vinaigrette

strawb4

All washed down with a bottle of shandy! These little bottles are one of my favourite summer drinks and I always keep a few in the fridge. Gone are the days where I can drink beer or cocktails all day long and not be asleep by 4pm so these lovely little drinks are a kind of halfway house!

strawb5

And for a pudding, I made these cheesecake stuffed strawberries. Now, I LOVE cheesecake. It is one of my favourite desserts and I am counting down the days until we can go to The Cheesecake Factory when we are in Las Vegas this summer. However, I am trying to eat as healthily as possible at the moment and so this recipe is a sort of deconstructed version of a strawberry cheesecake coming in at about 50 calories per strawberry.

strawb18

Ingredients

strawb19

A punnet of fresh strawberries

Half a tub of cream cheese (full fat works best, I found the low-fat version slightly too runny)

3 tablespoons of icing sugar

Half a teaspoon of vanilla extract

2 digestive biscuits, crumbled

How to make it

  • Begin by prepping the strawberries. Chop off the top and then use a sharp knife to cut out the white inner part of the fruit, leaving you with a hollowed-out strawberrystrawb22
  • It’s a tiny bit fiddly but once you have done a few, you really get the hang of itstrawb21
  • Next, make the filling by mixing together the cream cheese, icing sugar and vanilla extract until smooth and creamy
  • Then you can either fill the strawberries yourself ready to serve or have all the ingredients ready for your guests to put together themselves.strawb11
  • Spoon, or use a piping bag if you want full marks for presentation, the cream cheese mixture into the strawberries then sprinkle over the crushed biscuit to topstrawb12

As we were eating lots of finger food for lunch, I decided to leave the 3 elements to this pudding in separate bowls and put them together as we went…much more fun and hands-on if you are serving this with friends!

strawb14

Enjoying the Sunshine

Judging by the glorious weather here today, it appears that Spring has finally sprung! I am currently writing this sat outside with my sunglasses on, the sun on my face and a cup of tea…perfection!

sun5

Ian had to work today, which is a shame as this has been our first warm and sunny Saturday of the year but I hope it is a sign of things to come and we can enjoy many more. To make up for a day sat inside, I plan on taking us both out for a walk along the canal and beer this evening, so he doesn’t feel like he has missed out on the sunshine completely!

Although we, the British, are constantly mocked for going OTT as soon as the sun comes out (think shirtless men, cropped tops and hot pants, BBQs, going in the sea despite it still being freezing!), it is amazing to see the change that the weather brings in people.

sun8

It is well-documented that I love a lie-in at the weekends but this morning I felt almost guilty lying in bed, like I was wasting the day, so I was up and dressed by 9 (OK, so I had a small lie-in!) and sat outside for my morning cuppa. All the windows in my house are open to let some fresh air in and I feel a lot more energetic and just happier when the sun is shining.

I took myself off on a little walk earlier today, just a couple of miles around the outskirts of our village, and it was stunning.

sun1 sun3 sun4

I had a little tidy of the garden and it was lovely to see all the daffodils and primroses brightening the place up and I even spotted some tulips starting to open. It is really hard to resist cutting them all down to fill our house with flowers but I did take a small bunch for the dining room.

sun6 sun7 sun9

I hope you too have been able to get outside today and enjoy some much needed Vitamin D!

Latest Purchases #19 – Some New Jewellery

This weekend has flown by but they do say that happens when you are having fun, don’t they?

Yesterday, we made the most of some sunshine to get outside and fix our fence panels in the back garden. We inherited some rather rickety-looking ones when we bought the house and I am sad to say that one of them didn’t survive this awful weather we have had lately and was blown down in the winds!

photo28

Luckily, Ian’s parents came down to give us a hand and George was keen to help too!

photo30 photo29

Here is the finished result and I actually quite like the contrast in colours between the old, weathered wood and the newer panels, which will soon fade too.

photo31

Just being outside for a little while in the sun made me start thinking about my garden projects for the seasons ahead and the daffodils that should be here soon!

Today, I am sharing a few new accessories I have purchased recently. They were all online buys from various websites and if you want to know where I got them from then just leave a comment at the bottom and I will let you know!

First up is this lovely ‘Peace’ bracelet:

photo13

photo12

I’m not usually a huge fan of diamante but this is subtle enough to make it into my collection and I love how it can bring some sparkle to an outfit.

I also got this ‘Infinity’ bracelet on a turquoise band, which is a very popular style:

photo19

I have seen several of these bracelets worn together and I think is quite a cool, hippy look.

photo7

I also bought this ‘Anchor’ bracelet but gave it to my bestie as a present…I’m a good friend!

photo3

I am still making my mind up on these earrings:

photo10

They are a bit ‘fierce’ for me but I shall persevere as I like the unusual design.

photo9

Another nice necklace that can be worn with a casual or evening outfit:

photo15

photo14

I like the sharp lines of this piece and it makes a change from my usual charm necklaces.

photo27

A bit more of a statement piece:

photo6

photo18

This was described as a ‘Bunting’ design and I can see why. I love this colour and can see myself wearing it more in Spring and Summer.

photo26

photo24

So there you have it – a few pieces to add a bit of colour and interest to my wardrobe while we are waiting for the Spring/Summer collections to arrive in the shops!